Field Parameter Examples
Parameter Example 1:
The following parameter example does the following:
- Updates the training records for documents and users after signoff.
- Forces the user to preview the document before allowing them to signoff.
UPDATE_TRAINING=YES;PREVIEW_REQUIRED=YES;UPDATE_TRAINING_USER_FIELD=FORM_0001:Item_001;UPDATE_TRAINING_DOCUMENT_FIELD=FORM_0001:ITEM_003.;PREVIEW_REQUIRED_DOCUMENT_FIELD=FORM_0001:ITEM_003;PREVIEW_REQUIRED_USER_FIELD=FORM_0001:ITEM_001
This translates as follows:
On form 1 of the packet, the user is defined in the first field.
On form 1 of the packet, the documents are defined in the third field.
When signoff occurs, the system will verify that the individual has previewed the documents. After signoff, the individual training records for the user on form1, field 1 and the documents in form 1, field 3 will be updated with the date and time of their previewing the document.
You can adjust these parameters to fit the specific needs of the form.
Parameter Example 2:
If the PREVIEW_REQUIRED=NO, then the individual would not be required to preview documents before signing off.
STORE_PREVIEW_DATE=YES;DISPLAY_PREVIEW_DATE=YES
This translates as follows:
The preview date and time is stored in the database and also displays on the form after opening. If a document is deleted from the system, and it was attached to a form, the document will no longer display on the form even if the Lock Form on Signature options are used. If a preview parameter was used during the design of the form, the form will display without the document number listed and, if applicable, “Previewed by <name and date>” or “This document has not been previewed.”
See the sample form below.
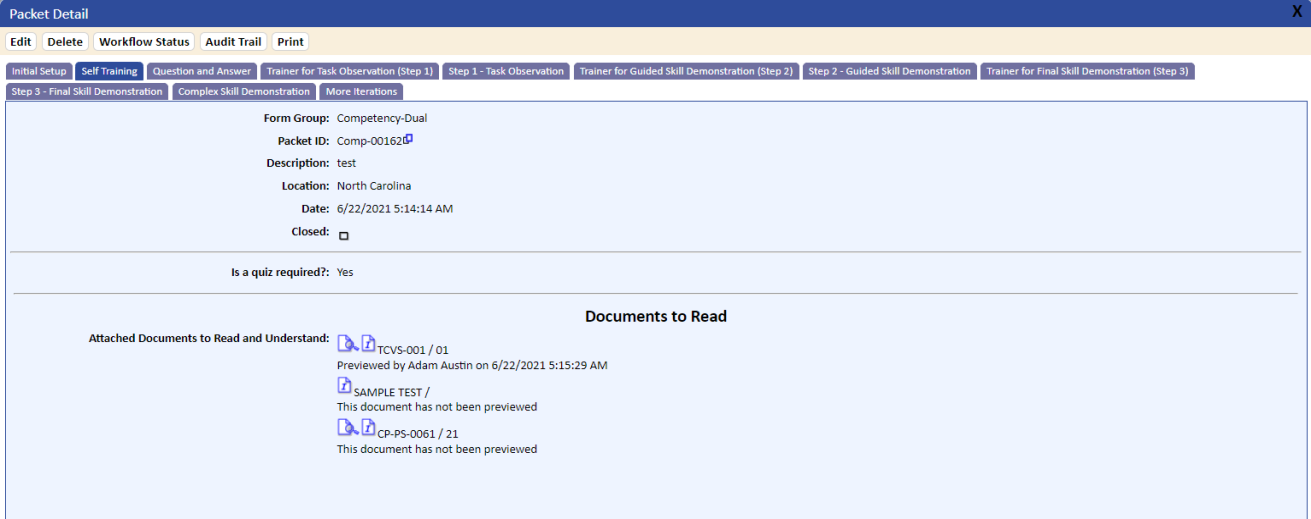
- Documents with preview date entries have been previewed.
- Documents with no preview date entries have not been previewed.
NOTE: If the document has been deleted from the system, clicking the Preview  icon displays preview information but no document.
Parameter Example 3:
This example demonstrates the use of the multi-column layout parameter.
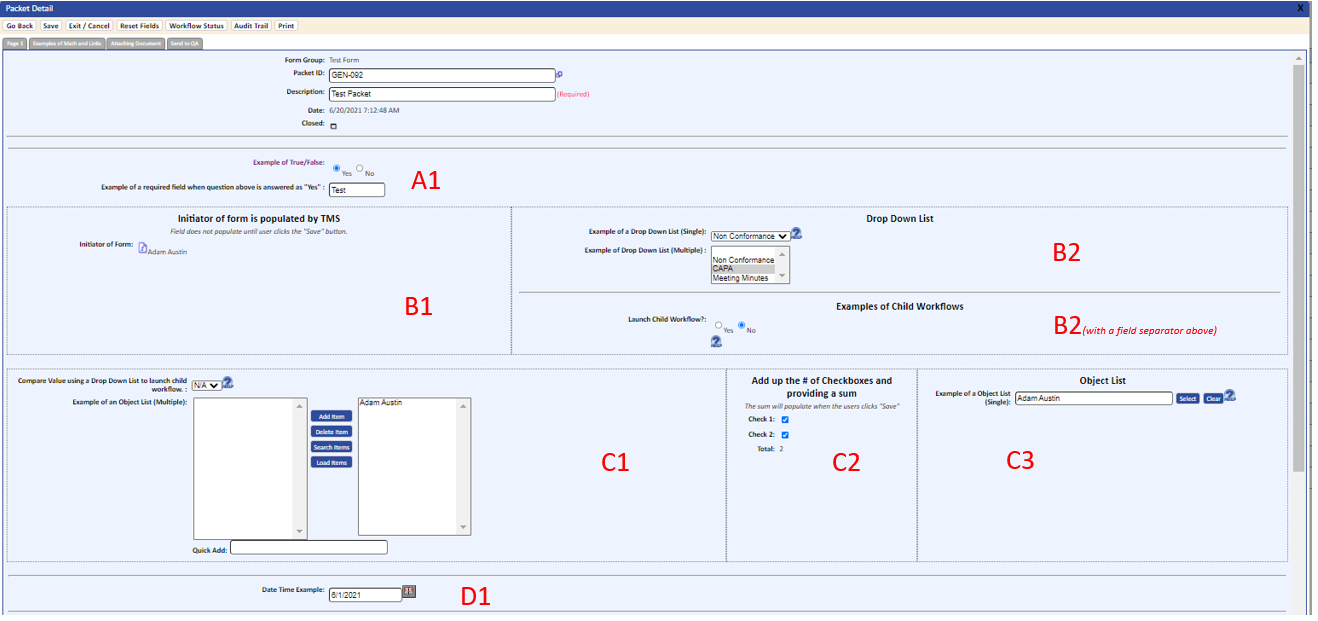
- In the first row, Fields 1 - 2 are grouped as one column. Only Field 1, which starts the grouping, requires the parameter. You would enter parameter LAYOUT_GROUP=A1 (which means Row A; Column 1). Fields 1-2 will now display in the first row as one column (Row A; Column 1) of the form.
- The second row (Row B) has two columns. If Field 3 starts the grouping for the first column (Column 1) in this row, then the parameter for Field 3 will be LAYOUT_GROUP=B1. Subsequently, the parameter for the first field in the next grouping for Column 2 will be LAYOUT_GROUP=B2. The horizontal line between the two fields in B2 is achieved by selecting the Field Separator Above checkbox on the form design.
- Each row can have different numbers of columns. For instance, Row C has three columns as displayed on the screenshot below as C1, C2, and C3. The last row, which is Row D, has only one column, which displays as D1.